
A leaking chimney flashing is one of the top causes of damp ceilings in Irish homes. Rain finds the smallest gap and runs straight into the attic, where it soaks insulation and rots roof timber long before a stain ever shows on the ceiling below.
This guide shows you how to fix leaking chimney flashing in clear, safe steps. You will learn what to check, what tools to use, and when to call a pro. It is written for normal Irish homeowners, not for tradespeople, so every step uses plain language and real-world tips from jobs we handle each week.
Read the full guide before you climb up. Ten minutes of planning saves hours of rework and protects you from the most common mistakes we see on attic call-outs.
What Is Chimney Flashing?
Chimney flashing is the metal seal between your chimney and the roof. Most Irish homes use lead flashing because it lasts longer and shapes well around brick.
The flashing has two parts. The upstand sits against the brick. The apron and step pieces sit on the roof tiles or slats.
On a working flashing, water hits the lead and runs down onto the tiles. The lead never lets water touch the joint where the chimney meets the roof. That joint is the weakest point on the whole roof.
When the flashing fails, even a light shower can soak the attic. That is why a small leak around the chimney must always be treated as urgent.
Common Causes of a Leaking Chimney Flashing
Before you learn how to fix chimney flashing leaks, you must know why they happen. Fixing the wrong cause is wasted work.
Most leaks fall into one of six clear causes. Each one needs a slightly different repair. Walk around the chimney and match what you see to the list below.
- Failed sealant: The mastic bead on top of the lead dries and cracks after 8 to 10 years.
- Lifted lead: Strong Atlantic winds peel the lead off the brick.
- Split lead: Old or thin lead splits along the fold lines.
- Loose mortar joint: The lead pulls out of the brick chase when the mortar fails.
- Poor original fit: Some builders skip the chase and just glue the lead on top.
- Missing soakers: On slate roofs, missing lead soakers let water slip in sideways.
In Ireland, failed sealant and lifted lead are by far the most common. Both come from our wet, windy climate. A repair that ignores the weather will not last.
If you see more than one cause at the same time, the flashing is at the end of its life. A full replacement will cost less in the long run than three patch jobs.
Signs You Have a Leak Around the Chimney
A flashing leak rarely drips fast. It seeps in slowly and quietly. By the time you see a stain, the timber above has often been wet for weeks.
Watch for these clear signs of a leak around your chimney flashing.
- Brown water stains on the ceiling near the chimney breast.
- Damp patches on the upstairs wall next to the chimney.
- Musty smell in the attic, even when it has not rained for days.
- Wet timber or rusted nails in the attic above the chimney.
- Peeling paint or wallpaper near the fireplace.
- White salt marks on the inside brick wall.
Check the attic with a torch the morning after heavy rain. That is when leaks show up best. Run your hand along the rafters near the chimney to feel for damp spots.
If you spot two or more signs, act fast. A small leak today will cause a ceiling collapse next winter. Mould and rot also drive up the final repair bill.
Tools and Materials You Will Need
Gather the right kit before you start. A half-stocked job leads to a half-sealed roof.
- Roof ladder and safety harness rated for your roof height.
- Wire brush and stiff hand brush.
- Plugging the chisel and small hammer to clean out the mortar chase.
- Code 4 or Code 5 lead sheet (Code 5 lasts longer).
- Lead dressing mallet or boxwood dresser.
- Tin snips for cutting lead.
- Lead mate or quality polyurethane sealant.
- Ready-mix mortar or pointing compound.
- A bucket of clean water and a sponge.
Most builder merchants in Ireland stock lead sheet in 3 metre rolls. Buy the next size up from what you think you need. Spare lead is far cheaper than a second trip up the roof.
Skip cheap lead substitutes for permanent jobs. They look like lead but split inside a few winters. Real lead is the only material we trust for Irish chimneys.
How to Fix Leaking Chimney Flashing: Step by Step
Follow these six steps in order. Skipping a step is the top reason home repairs fail in one winter.
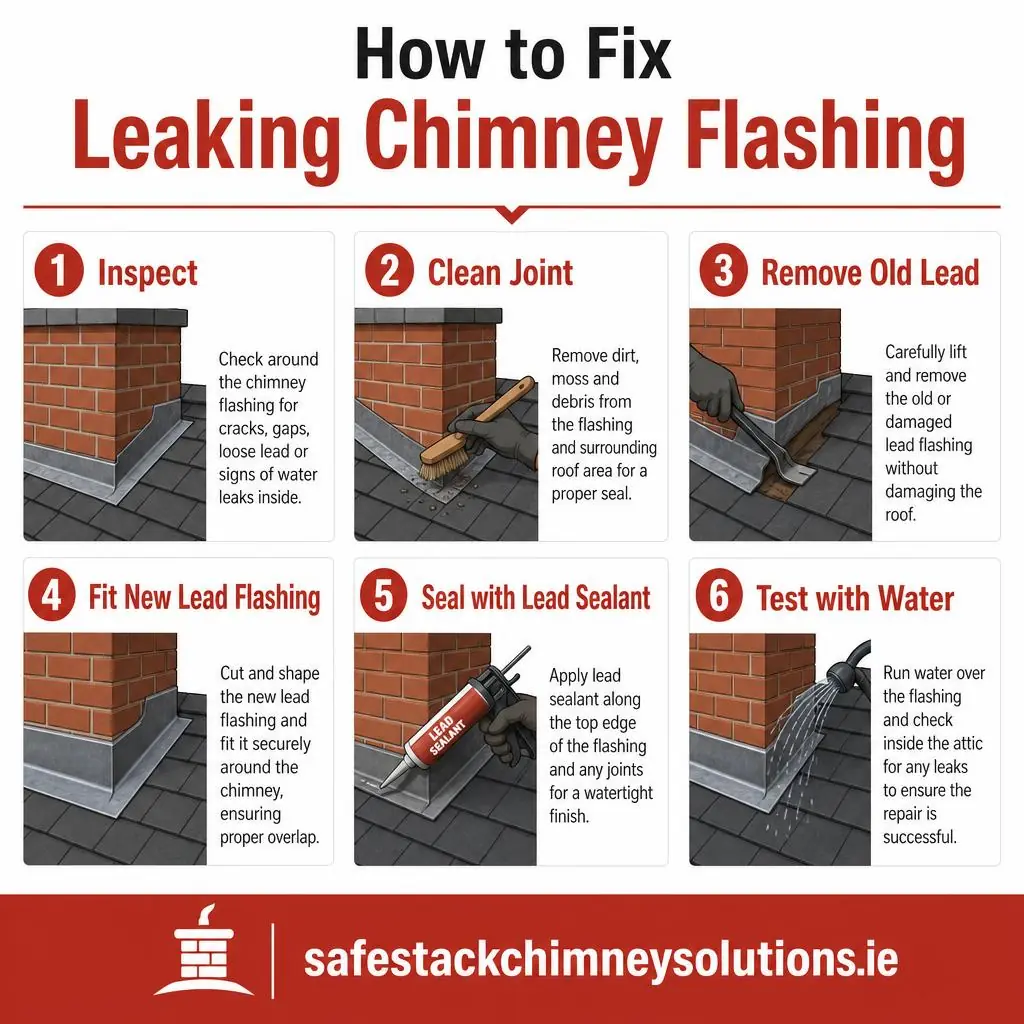
Step 1: Inspect the Flashing
Climb safely to the roof on a dry, calm day. Check the full base of the chimney on all four sides.
Look for cracked sealant, lifted lead, split metal, and gaps in the mortar chase. Mark every fault with chalk so you do not miss one.
Take clear photos of each side before you touch a thing. Photos help with insurance later. They also help you check your work when the job is done.
Step 2: Clean the Joint
Brush off all moss, dirt, and loose paint. A clean joint is the only way to get a lasting seal.
Use the wire brush on the brick. Use the stiff hand brush on the lead. Wipe with a damp sponge and let it dry.
Skip pressure washers near the chimney. The high spray drives water under the lead and can make the leak worse before you even start the repair.
Step 3: Remove the Old Lead or Sealant
If the lead is sound, you only need to remove the cracked sealant. Scrape it out with a small chisel.
If the lead is split or lifted, peel it back and remove it fully. Use the plugging chisel to clear the mortar chase to a clean depth of 25 mm.
Recycle the old lead at any local scrap yard. Lead has a strong resale value in Ireland. The cash can cover most of your new sealant cost.
Step 4: Fit New Lead Flashing
Cut a new Code 5 lead to the length of the chimney side. Add 150 mm extra to lap over the roof tiles.
Dress the lead with the mallet so it sits tight to the brick and follows the tile line. Push the top edge into the clean chase.
Wedge the lead in place with small lead clips every 450 mm. Then point the chase with fresh mortar.
Work one side of the chimney at a time. Always lap the next piece over the one below it. That way, water flows down and out, never up and in.
Step 5: Apply Lead Sealant
Run a clean bead of lead mate sealant along the top edge of the new flashing. Smooth it with a wet finger.
Do the same along any joint where two lead pieces meet. Keep the bead even and tight to the brick.
Pick a dry day with no rain forecast for 24 hours. Sealant needs that time to cure. A wet bead will wash off in the next shower and leave you back at square one.
Step 6: Test with Water
Wait at least 4 hours for the sealant to skin over. Then run a garden hose over the chimney for 5 minutes.
Have a second person check the attic with a torch. No drips means the repair is sound. Any drip means you must lift and refit that section.
Test each side of the chimney in turn, not all at once. That way, you know exactly which side leaks if a drip shows. Note the result in your phone for your records.
How to Fix a Leak Around Chimney Flashing on a Slate Roof
Slate roofs need extra care. Slates crack if you stand on them or pry them with metal tools.
Use a slate ripper to lift the slats near the chimney. Replace any cracked slats before you refit the flashing.
Always include lead soakers between the slats and the chimney brick. Soakers stop water from running sideways into the attic.
Each soaker should be 150 mm wide and as long as one slate plus a 75 mm lap. Sit one soaker under each slate course up the side of the chimney.
On old natural slate roofs, keep spare slats to hand. Brittle slats often crack the moment you lift them, and a half-fixed roof in the rain is a costly mistake.
How to Fix a Leaking Chimney Flashing on a Tiled Roof
Concrete and clay tile roofs are more forgiving. The lead apron sits on top of the tile, not under it.
Lift the tiles only at the top corner. Slide the new lead apron in place and press it down with the dresser.
Bed the tiles back in fresh mortar. Then seal the lead-to-brick chase as in Step 5.
Make sure the apron drops at least one full tile width onto the roof. A short apron looks neat, but lets wind-driven rain blow under the hood in winter storms. On any exposed coastal site, a one-and-a-half tile lap is safer than the standard single tile drop.
Quick Fixes vs Full Repair
Sometimes you need a fast fix before a storm. A short-term patch can buy you a few months while you plan the proper job. Treat every patch as a sticking plaster, not a cure.
- Self-adhesive flashing tape: Press over the leak. Lasts 3 to 6 months.
- Tube of mastic sealant: Smear over the gap. Lasts 6 to 12 months.
- Lead-look paint sealant: Brush over splits. Lasts up to 2 years.
Apply any patch on a dry surface. Wet brick repels the glue, and the patch peels off in the next downpour. A small gas torch held 200 mm from the brick for a minute will dry damp lead enough to take the tape if rain is on the way.
These patches are not a real fix. Book a proper lead repair as soon as the weather allows. The longer a patch stays, the more hidden damage builds up under the lead, and insurers may treat a long-running patched leak as neglect rather than storm damage.
Safety Rules When Working at Height
Roof work is the top cause of DIY injury in Ireland. Take safety as seriously as the repair itself. A flashing repair takes a couple of hours; a back injury can take years.
- Never work alone. Have a second person on the ground.
- Use a roof ladder with a ridge hook, not a leaning ladder.
- Wear a harness clipped to a fixed anchor point.
- Skip the job in rain, frost, or winds over 30 km per hour.
- Wear non-slip boots, gloves, and eye protection.
- Keep tools in a roof bag, not in your pocket.
Wash your hands well after handling lead. Lead dust is harmful if it gets into food or your eyes. Keep children and pets away from the work area.
If your chimney is over one storey high, hire a pro. The cost of a fall is far higher than the cost of a repair. Most pros carry their own scaffolding, harness, and insurance.
When to Call a Professional
DIY makes sense on a bungalow with minor sealant damage. Anything bigger needs a pro.
Call a chimney specialist if:
- The chimney is on a two-storey or steep slate roof.
- Lead is split, missing, or lifted on more than one side.
- You can see daylight from the attic near the chimney.
- The chimney brick itself is loose or crumbling.
- The leak has soaked the attic insulation or the ceiling.
A trained roofer will spot hidden damage that a homeowner often misses. Things like rot in the rafters or cracks in the chimney pot can cause leaks long after the lead is fixed.
At Safe Stack Chimney Solutions, we handle full lead flashing repairs across Ireland. Every job ends with a photo report and a written guarantee.
How to Prevent Future Chimney Flashing Leaks
Good care doubles the life of your repair. Use this simple yearly routine, and you should not need another flashing job for decades.
- Check the chimney from the ground after every storm.
- Clear gutters near the chimney each autumn.
- Reapply lead sealant every 8 to 10 years.
- Book a roof inspection every 5 years.
- Trim back any tree branch that touches the chimney.
Keep every receipt, photo, and inspection report in one folder. A clear maintenance record speeds up any future insurance claim and adds value when you sell the home.
How Much Does It Cost to Fix a Leaking Chimney Flashing?
DIY repair costs €40 to €120 in materials. A pro repair in Ireland costs €350 to €1,500 based on lead grade and roof height. Scaffolding, access, and the number of sides needing work are the biggest cost drivers.
For a full price breakdown, read our Chimney Flashing Repair Cost Guide. Always get two written quotes before approving any work over €500 and ask the roofer to photograph the fault before and after the repair.
Frequently Asked Questions
Can I use silicone to seal chimney flashing?
Silicone is not the right product for lead. Use lead mate or polyurethane sealant instead. They bond to lead and brick and flex with the metal as it expands in summer heat and contracts in winter cold.
How long does a chimney flashing repair last?
A proper lead repair lasts 30 to 50 years. The sealant bead on top needs a refresh every 8 to 10 years. In exposed coastal locations, knock 20 per cent off both numbers because of constant salt and wind exposure.
Why does my chimney leak only in heavy rain?
Wind-driven rain hits the chimney at an angle. A small gap that stays dry in soft rain turns into a leak when the rain is heavy. Storms from the west and south-west cause most leaks we see in Ireland, since they push water sideways into the upstand.
Can I fix the leak from inside the attic?
No. The leak must be sealed at the source on the roof. Attic patches only hide the damage for a short time. They also trap damp under the patch, which can rot the rafter faster than the original leak would have.
What is the best time of year for this repair?
Late spring through early autumn. Dry, mild weather lets the sealant cure and the lead sit right. Avoid the first cold snap of October, that is when most patch jobs fail because the sealant never fully cures.
Book a Free Chimney Inspection
You now know how to fix a leaking chimney flashing the right way. If the job feels too big or too high, get expert help.
Contact Safe Stack Chimney Solutions for a free chimney inspection. We give fixed prices, lead-grade detail, and lasting repairs across Ireland.